
I introduce to you... Halloween Mini Book 2009!
Yep, this is what I MEANT to post waaaay back when when I figured there were some of you hesitating to buy the kit (which I still have 16 of in the Etsy store), just waiting to see a few examples.
 Believe me when I tell you that this one was a VERY simple book! Mostly just the patterned paper that came in the kit and 4x6 pictures.
 Of course, I had to pull out the favorite ol' white pen!
 And the little shape below in the bottom right corner was included in the kit. I just inked the edge of it and used a gel pen.
 Oh, yeah. There it is. Close up style.
 There is a new product that looks like fingernail polish, but is acrylic paint. I LOVE it! I think it is also called Schmooze or something like that. It is so easy to paint little doodles with.

 In the kit, I had the clear acrylic letters. I just painted, very sloppily, the edges of the words I chose and stapled them on in some cases, and I think I used Glue Lines on these. The only thing on these pages is patterned paper from the kit, letters from the kit (painted with black acrylic paint) and I added a few ribbons.

 And you KNOW I had to ink all the edges! If you got this Halloween kit, you will have LOTS of leftovers to use for your tag project.
 This black and white polka dotted paper would be great in the tag book. And, the letters are very versatile too! Just sayin'!
 These pages... very, very simple. I did add a border of mini pumpkins that weren't in the kit but that I had in my stash and just loved!
 And then, these black glittery letters were all intact until I let someone borrow the book for ideas. I lost an "i", but never fear! That is the beauty of doing a "less than perfect" book. I just ripped some junkmail in my car and drew an "i" with a black pen I had in my car.
 I also had some orange glitter paper in my stash that I added!
 I am always happy with pages that are next to each other, with pictures being different sizes. Like 2x2" pictures on one and 4x6 across from it.
 Nothing fancy. Just handwritten words describing details of our night.
 And then, I added a pic or two of my cute little kitten niece, Maddi.
 I included this pompom trim in the kit.
 ANd instead of using the ribbon I included in the kit on the rings like I usually do, I used little pieces here and there on the edges of pages. You could do something similarly on your 52Q tags.
 Start hanging onto good looking ribbons on gifts that you are given. I am psycho about ribbon. I never throw it away! You only need a tiny sliver of it to embellish a page!
 These brads with all the fun pictures on them were also included in the kit. (the black cat)
 And you just KNOW I can't function without my white pen. Signa? Sigma? Something like that!
 I liked more than one picture of Gabbi on this four wheeler, so I used one in a squarish format and cut around the other one to layer them.
 Don't forget... any of these ideas would also work on your 52Q tag book!
 I also try to do some of my journaling vertically and some of it horizontally. Just adds interest, I think!
 I also purposefully added Linda Lou and my girls' picture on a bit of a slant.

 And another tidbit of ribbon.

 Something I rarely do and can't say that I love it...
 I left this page bare. I think I prefer most of the background covered. I love it when other people have raw backgrounds, but when I do it, I just like paper on all the pages, or at very least, paint.
 The orange circles above are more of that fingernail polishy stuff. I used some holey paper I had as a background, as well as some green glittery borders on each side. Best of all was the rhinestone stickers I found at my most favorite store on earth, Eclectica, in Germantown, TN!!
 Ohhhhh, and here is a little peekaboo page. I wanted to add an extra wallet sized photo, so I just used some gaffer tape to adhere it. I have mentioned gaffer tape a million times, and that is because I LOVE it! It is very strong and can basically attach whole pages. Gaffer is what is used as book binding in many cases.
 Believe me when I tell you that this one was a VERY simple book! Mostly just the patterned paper that came in the kit and 4x6 pictures.
 Of course, I had to pull out the favorite ol' white pen!
 And the little shape below in the bottom right corner was included in the kit. I just inked the edge of it and used a gel pen.
 Oh, yeah. There it is. Close up style.
 There is a new product that looks like fingernail polish, but is acrylic paint. I LOVE it! I think it is also called Schmooze or something like that. It is so easy to paint little doodles with.
 In the kit, I had the clear acrylic letters. I just painted, very sloppily, the edges of the words I chose and stapled them on in some cases, and I think I used Glue Lines on these. The only thing on these pages is patterned paper from the kit, letters from the kit (painted with black acrylic paint) and I added a few ribbons.
 And you KNOW I had to ink all the edges! If you got this Halloween kit, you will have LOTS of leftovers to use for your tag project.
 This black and white polka dotted paper would be great in the tag book. And, the letters are very versatile too! Just sayin'!
 These pages... very, very simple. I did add a border of mini pumpkins that weren't in the kit but that I had in my stash and just loved!
 And then, these black glittery letters were all intact until I let someone borrow the book for ideas. I lost an "i", but never fear! That is the beauty of doing a "less than perfect" book. I just ripped some junkmail in my car and drew an "i" with a black pen I had in my car.
 I also had some orange glitter paper in my stash that I added!
 I am always happy with pages that are next to each other, with pictures being different sizes. Like 2x2" pictures on one and 4x6 across from it.
 Nothing fancy. Just handwritten words describing details of our night.
 And then, I added a pic or two of my cute little kitten niece, Maddi.
 I included this pompom trim in the kit.
 ANd instead of using the ribbon I included in the kit on the rings like I usually do, I used little pieces here and there on the edges of pages. You could do something similarly on your 52Q tags.
 Start hanging onto good looking ribbons on gifts that you are given. I am psycho about ribbon. I never throw it away! You only need a tiny sliver of it to embellish a page!
 These brads with all the fun pictures on them were also included in the kit. (the black cat)
 And you just KNOW I can't function without my white pen. Signa? Sigma? Something like that!
 I liked more than one picture of Gabbi on this four wheeler, so I used one in a squarish format and cut around the other one to layer them.
 Don't forget... any of these ideas would also work on your 52Q tag book!
 I also try to do some of my journaling vertically and some of it horizontally. Just adds interest, I think!
 I also purposefully added Linda Lou and my girls' picture on a bit of a slant.
 And another tidbit of ribbon.
 Something I rarely do and can't say that I love it...
 I left this page bare. I think I prefer most of the background covered. I love it when other people have raw backgrounds, but when I do it, I just like paper on all the pages, or at very least, paint.
 The orange circles above are more of that fingernail polishy stuff. I used some holey paper I had as a background, as well as some green glittery borders on each side. Best of all was the rhinestone stickers I found at my most favorite store on earth, Eclectica, in Germantown, TN!!
 Ohhhhh, and here is a little peekaboo page. I wanted to add an extra wallet sized photo, so I just used some gaffer tape to adhere it. I have mentioned gaffer tape a million times, and that is because I LOVE it! It is very strong and can basically attach whole pages. Gaffer is what is used as book binding in many cases.
 And note the ribbon above. I just laid it on the page and stapled it. Then, I pleated it forward and stapled it again. over and over and over. ANybody got the word "flow"? I think this looks like "flow" to me.

 Then, with all my scraps, I made squares. Totally NOT square nor symmetrical squares! I, naturally, inked every page. This would make a COOL 52Q page.
 Here it is a little closer.
 And a very simple page. The papers, letters, and ribbon from the kit.


 Again... simple pages. The stars on Pops' shoulders were the rub-ons that were included in the kit. I intended to write on the page on the right, I just havent' yet.


 And as I was nearing the end of my book, I realized I had lots of extra pictures which weren't going to make the cut! Soooo....
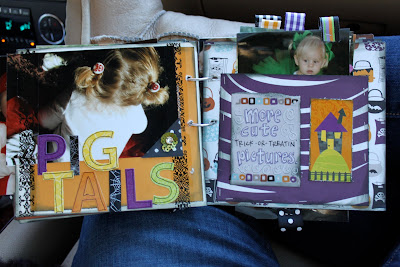 Once I highlighted the PIGTAILS, and HAD to show off the skull and crossbone rubber bands, ...
 I simply stapled on a patterned paper as a pocket to hold several pictures of the night. I think the haunted house is a sticker I had previously. I scruffed up the edges and added some ink, and ta da!
 More use of the ribbon.
 The square border across the top and bottom of the "more cute...." is made of rub-ons included in the kit.
 On this page, I used a little scrap piece of gaffer tape to make an interactive page. I wanted to use a space in the book to describe our costumes and how we came about getting them.
 Except of course, I had to call them our "coscumes"!
 Oh, there it is... gaffer tape!
 And more checkerboard gaffer tape on the inside. I used a bit of ribbon on the edge to as a cue to lift to see the picture and description that was hiding beneath.


 This "arrgh" is made from the same clear letters in the kit, but this time, instead of just painting the edges of the letters, I painted the entire back. I could have just as easily painted the front or glued the front and added glitter. ooooooooohhh. I may have to try that on one of my tags.
 Guess what. We are almost done! So hang on!
 The lower left corner. Another of the shapes included in the kit. I just used the rub-ons (in the kit too) on solid color paper and tore/ cut the words out, inked them, and stuck them on the shape.
 Ooops. Looks like a repeat. Sorry.

 The rub-ons in the kit are very versatile and should be great for adding the questions to the tags.

 I printed off these pictures at Walgreen's. They require you to buy 4 of the same picture if you want to have wallet sized photos. Soooo, I put a page in that had the four pictures all still on the original sheet. I just think it is cool looking.
 Especially with ribbons all the way down the side! :)

 Then, with all my scraps, I made squares. Totally NOT square nor symmetrical squares! I, naturally, inked every page. This would make a COOL 52Q page.
 Here it is a little closer.
 And a very simple page. The papers, letters, and ribbon from the kit.

 Again... simple pages. The stars on Pops' shoulders were the rub-ons that were included in the kit. I intended to write on the page on the right, I just havent' yet.

 And as I was nearing the end of my book, I realized I had lots of extra pictures which weren't going to make the cut! Soooo....
 Once I highlighted the PIGTAILS, and HAD to show off the skull and crossbone rubber bands, ...
 I simply stapled on a patterned paper as a pocket to hold several pictures of the night. I think the haunted house is a sticker I had previously. I scruffed up the edges and added some ink, and ta da!
 More use of the ribbon.
 The square border across the top and bottom of the "more cute...." is made of rub-ons included in the kit.
 On this page, I used a little scrap piece of gaffer tape to make an interactive page. I wanted to use a space in the book to describe our costumes and how we came about getting them.
 Except of course, I had to call them our "coscumes"!
 Oh, there it is... gaffer tape!
 And more checkerboard gaffer tape on the inside. I used a bit of ribbon on the edge to as a cue to lift to see the picture and description that was hiding beneath.

 This "arrgh" is made from the same clear letters in the kit, but this time, instead of just painting the edges of the letters, I painted the entire back. I could have just as easily painted the front or glued the front and added glitter. ooooooooohhh. I may have to try that on one of my tags.
 Guess what. We are almost done! So hang on!
 The lower left corner. Another of the shapes included in the kit. I just used the rub-ons (in the kit too) on solid color paper and tore/ cut the words out, inked them, and stuck them on the shape.
 Ooops. Looks like a repeat. Sorry.
 The rub-ons in the kit are very versatile and should be great for adding the questions to the tags.
 I printed off these pictures at Walgreen's. They require you to buy 4 of the same picture if you want to have wallet sized photos. Soooo, I put a page in that had the four pictures all still on the original sheet. I just think it is cool looking.
 Especially with ribbons all the way down the side! :)
And on the back, a 4x6 with ribbons everywhere too! LOVE that picture of Gabbi Girl with her sucker.

 I think the simpler my pages, as far as "stuff" on it, the more I feel the need to distress the edges of the photos and add lots of ink/ paint.
 They make actual edge scrapers to easily distress the edges. Mine is by Heidi Swapp. I think Tim Holtz makes one too.
 And I dont' know if you have been able to tell this, but these pictures were taken in the vehicle on the way up to see my Poppa the night he passed away. I laid the book in my lap and started snapping. I had three and a half hours to get it in my camera. That, in itself, is a memory for me.
 More use of my glittery letters from the kit. I LOVE black letters. That is probably one of the things (Scrap speaking) that I buy the most!
 You can just use them for just about any theme.
 But, I ran out of glitter letters, so I had to add in a different black letter. But guess what. WHO CARES?! It looks great! In fact, I think I PREFER it!
 ANd of course, I had to sign my babies' book by their MOM!
 Yep. I made it over the Thanksgiving break. Remember we were at the beach for a week. I just decided (or RESOLVED or set my INTENTION or CHOSE )to make this happen and voila! I had it done. I knew we would be busy. and I knew that we would have two toddlers making it virtually impossible, but I kept it relatively simple and worked at night when they went to sleep. It was completed in two nights. You can do this! I really mean it. I really believe it!
 By the way, my NESTING is going great! How is yours going?
Mo
10 comments:
sMo you're just so "artsy"!!! LOVE the book!
i love the book thanks for sharing it with us what you do is so great i wish i was as good as you.. and oh can u please tell me the name of the white pen you write with ? i want to get one sometime. thanks for posting what u did with the scrapbook.. i wish i was as good as you.. hugs and love ya
Cute, cute, cute!
Love it!!
Love, love, love it (and those girls)!
I'm working on my 52Qs. I've almost got my word for 2010 one done. I'll try to get a picture posted. Hopefully I can figure out how to do it.
Mo, Could you give any tips on how you make your canvases? How do you make your backgrounds, what kind of paint do you use? Thanks!!
You are so right....Freeze Frame..Tell the girls Hi and that i love them...great book..I really do believe your enthusiam might be even rubbing off on me...
Hi Mo ~ What a beautiful book for two beautiful girlies! I do not have a talented bone in my body, but I do appreciate talent when I see it. Funny story about me not being talented.....I volunteered at a Nursing home and they paired me up with a woman and the activity of the day was to make a flower bouquet from tissue paper. The woman said she did not want to do it, so I said "No problem, I will make it for you" (Understand that I had no clue as to what I was doing, so I was watching the other volunteers) and I made the bouquet. When we were all finished, I handed my bouquet to her - she looks at me and says: "I don't want that sh*t". I was laughing so hard and so was the lady - so as you can see, I TRY, but do not get anywhere. Remember a while back I mentioned that my girls would BEG me to stay out of their school projects - we still laugh at that too. Oh well, my talents lie elsewhere I guess. In the meantime, I will enjoy your talent. Have a great weekend,
Diana from Colorado
CUTE CUTE CUTE! I LOVE the pics! The scrapbook is amazing. very nice job! =)
Hi, my Grandma (Red's wife) directed me to your website to check out your beautiful little girls and scrap pages. I just wanted to drop a line and let you know I enjoyed peeking!!!
Post a Comment